Pressed Italian Picnic Sandwich Loaf
Picture this: It’s a perfect summer afternoon. Sunlight filters through the leaves, your favorite people are chatting and laughing on colorful blankets, and you unveil a sandwich that instantly steals the show. Meet the Pressed Italian Picnic Sandwich Loaf—a portable flavor powerhouse that’s as practical as it is impressive. Trust me, after bringing this beauty to beach days, hiking trips, and a fancy parking lot tailgate (don’t ask!), I can promise you: This is more than a sandwich. It’s a whole mood.
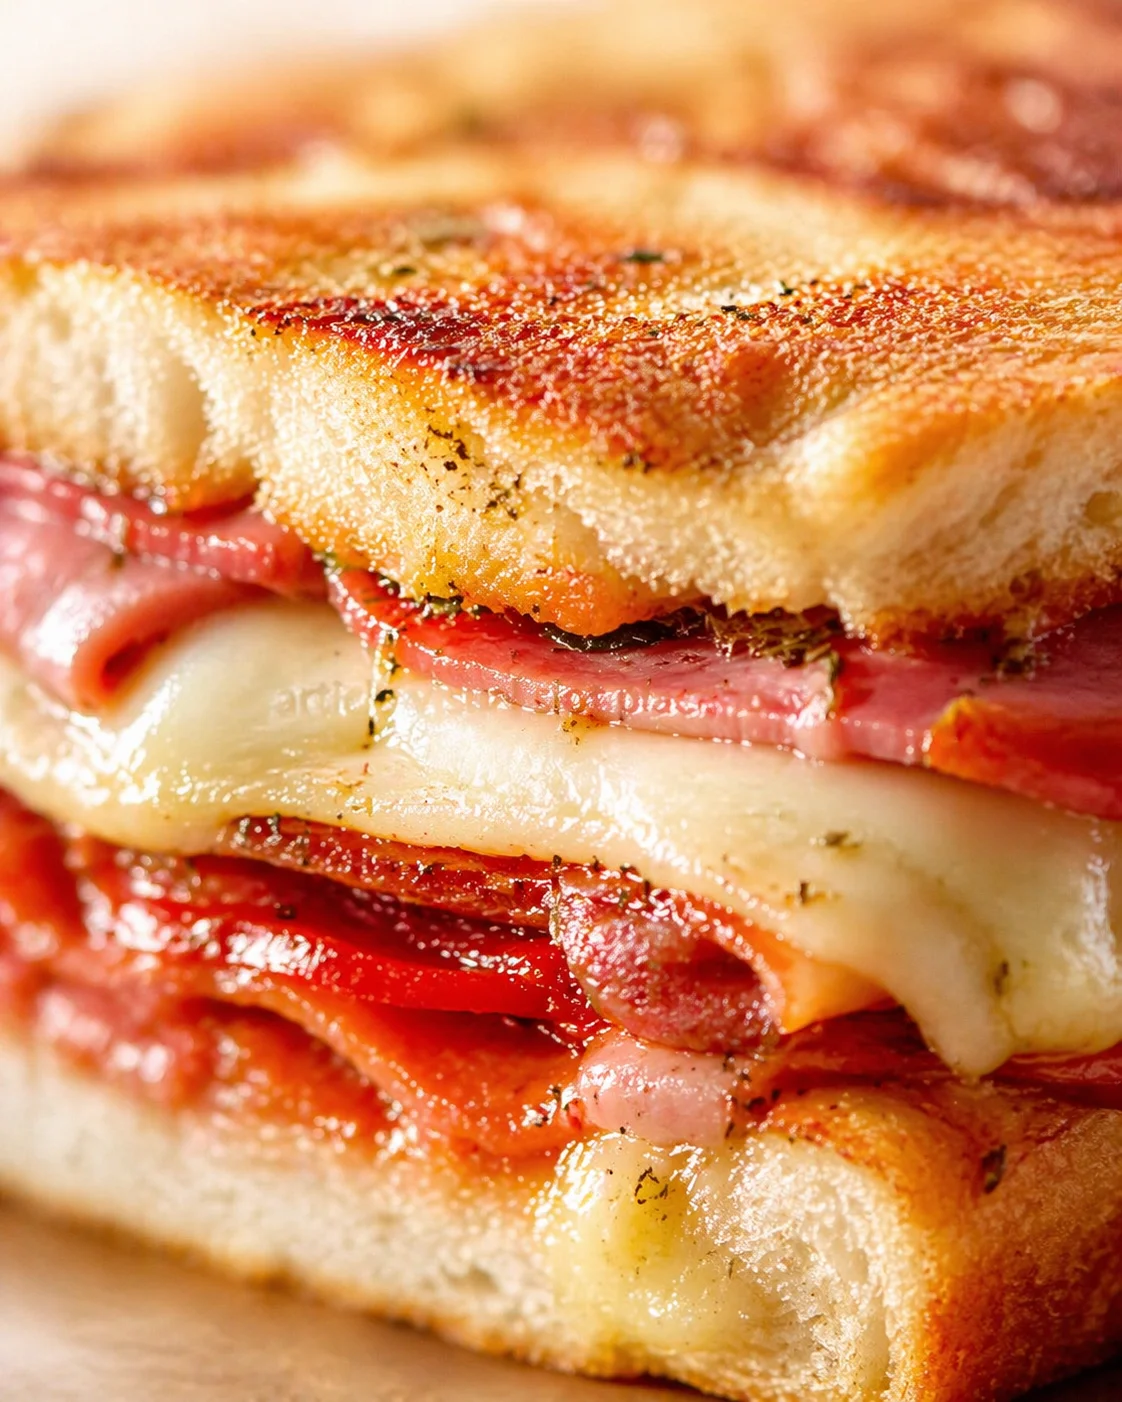
So, what makes this loaf such a winner? Let me slice it up for you. We’re talking about layers of salty, sweet Italian deli meats, a zesty olive tapenade that wakes your taste buds, and a clever overnight pressing method that turns it into a mess-free, perfectly sliceable masterpiece. No mayo drips, no bread flop—just pure, shareable deliciousness. Whether you’re feeding a crowd or prepping meals ahead, this loaf has your back. Ready to become the outdoor gathering legend? Let’s dive in and stack it up!
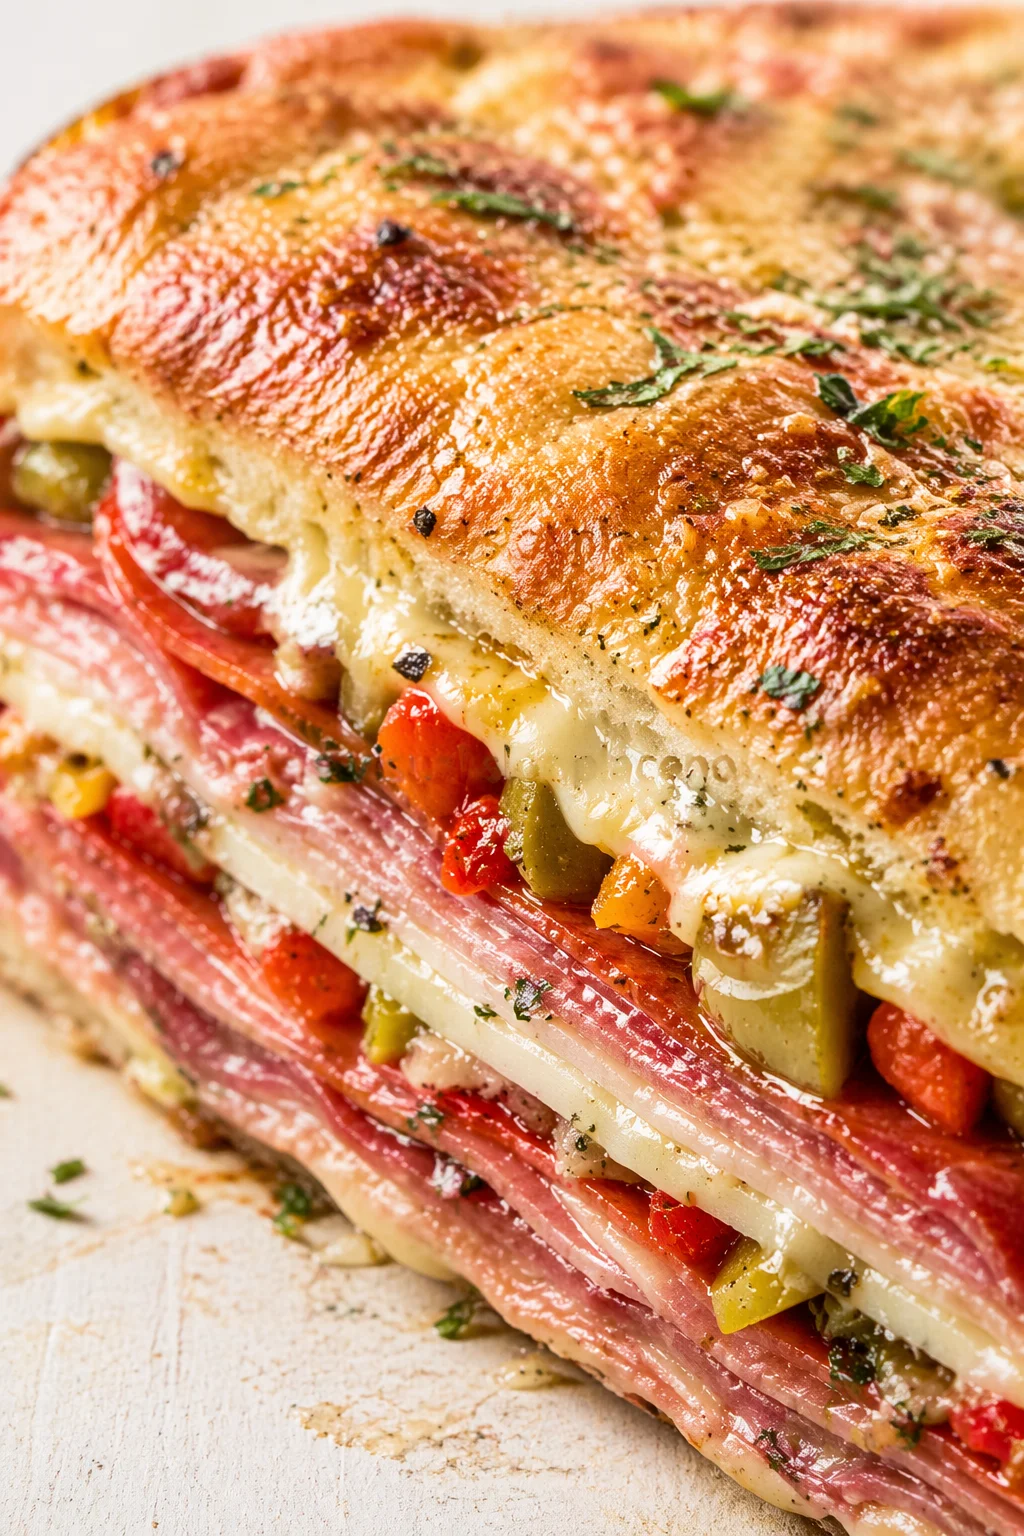
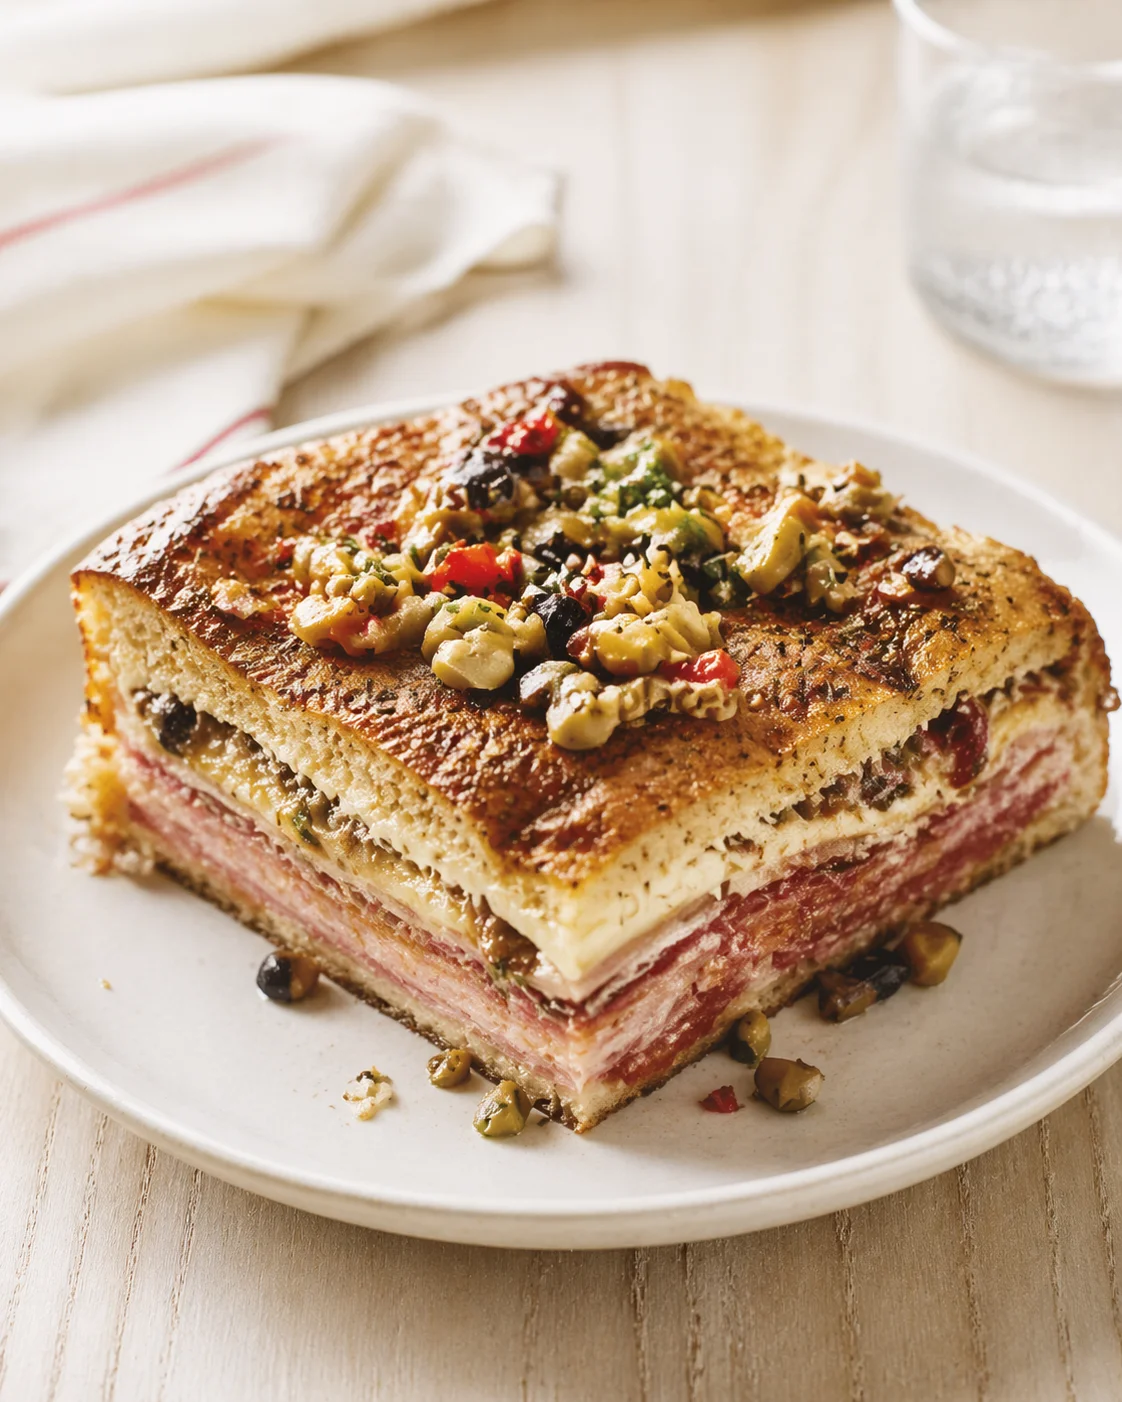
Think of this as your go-to party trick: a loaf that doubles as a stunning centerpiece, slices like a sandwich, and travels like a champ. Simply put, the Pressed Italian Picnic Sandwich Loaf is a hollowed-out crusty round filled with layers of classic Italian deli magic, a flavorful tapenade “glue,” and plenty of cheese and veggies to keep every bite exciting. After a good night in the fridge pressed under weight, those layers meld together into a tight, no-drip, easy-to-slice loaf that’s perfect for picnics, potlucks, or chill make-ahead meals.
Here’s a peek at what you’ll find in this recipe and the article:
- How to hollow out your loaf cleanly and spread a moisture barrier to keep bread firm.
- The best layering order (meats first, veggies later) and flavor combos that really pop.
- The pressing technique—wrapping, weighting, chilling—plus timing tips. Plan for at least 8 hours, but overnight (12–24 hours) is even better.
- Tips for serving, transporting, and storing your loaf so it looks and tastes amazing when you’re ready to enjoy it.
- Quick swaps and creative twists—including vegetarian, spicy, breakfast options, and more—so you can make this recipe your own.
Excited to get your hands in? Head to the ingredients and assembly sections next to grab your loaf and start building—this recipe rewards patience with big smiles and big flavors. Let’s get pressing!
What Makes It Irresistible
Flashback to my cousin’s lakeside wedding. I volunteered to handle snacks after the ceremony. Then it poured cats and dogs. As guests huddled under soggy tents, I brought out my secret weapon: a triple-layered pressed loaf. The crowd went nuts—partly thanks to the Prosecco, but mostly from the rich, garlicky, cheesy layers cutting through the damp gloom. A flower girl even chose seconds of this sandwich over cake. Right then, I knew: This wasn’t just food. It was a mood lifter, a rainy-day hero, and basically a big, edible hug. Now, I never plan an event without it. Rain or shine, this loaf always delivers.
Ingredients to Build the Loaf
- 1 large crusty round loaf (boule or Italian) — slightly stale bread works best to hold up under press (ciabatta works too but hollow it less deeply)
- 1/4 cup olive tapenade (or pesto plus chopped Kalamata olives)
- 4 slices provolone (melts just enough during pressing; or cashew cheese slices for a vegan option)
- 6 slices salami (spicy if desired; capicola or soppressata are great alternatives)
- 6 slices ham or turkey (roasted turkey adds a lovely sweetness; grilled zucchini slices for a vegetarian swap)
- 4 roasted red pepper strips (jarred is easy and tasty; or char your own)
- 1 cup baby spinach (or substitute arugula or fresh basil)
- Olive oil (for brushing the crust before serving)
Assemble, Press, and Serve
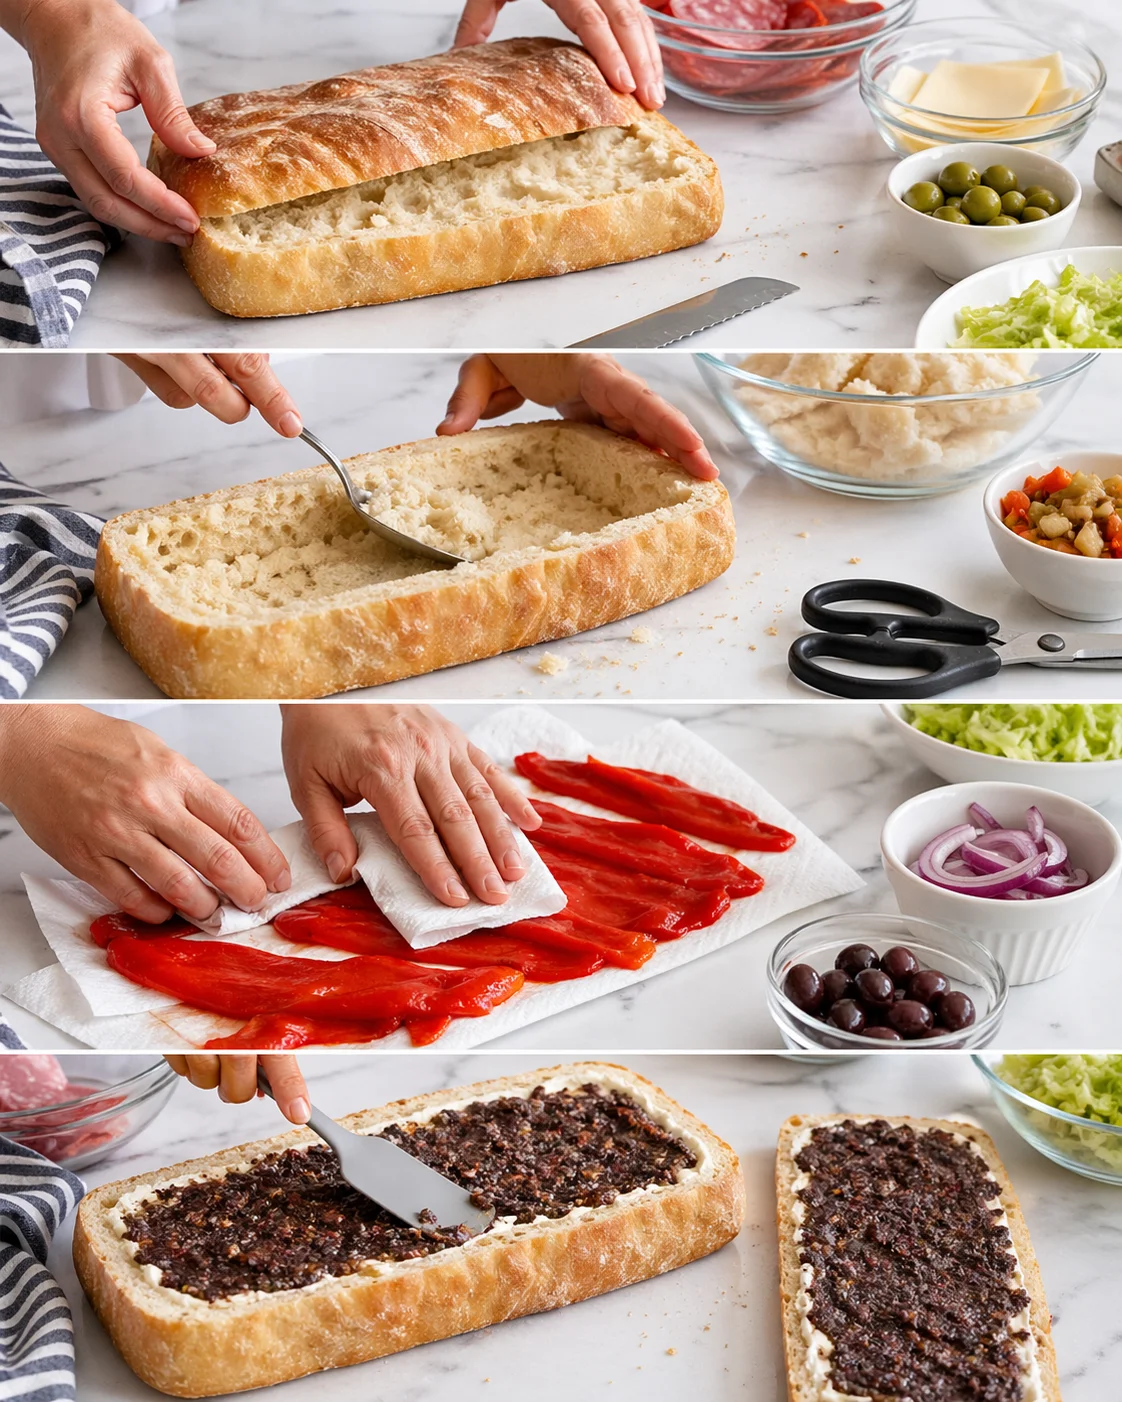
- Slice off the top quarter of the loaf.
- Scoop out the soft interior, leaving about a 1-inch shell; trim tricky crust spots with scissors if needed.
- Pat roasted red pepper strips dry to remove excess moisture.
-
Spread olive tapenade evenly on the loaf base and the removed lid (optionally spread a thin layer of cream cheese under the tapenade).
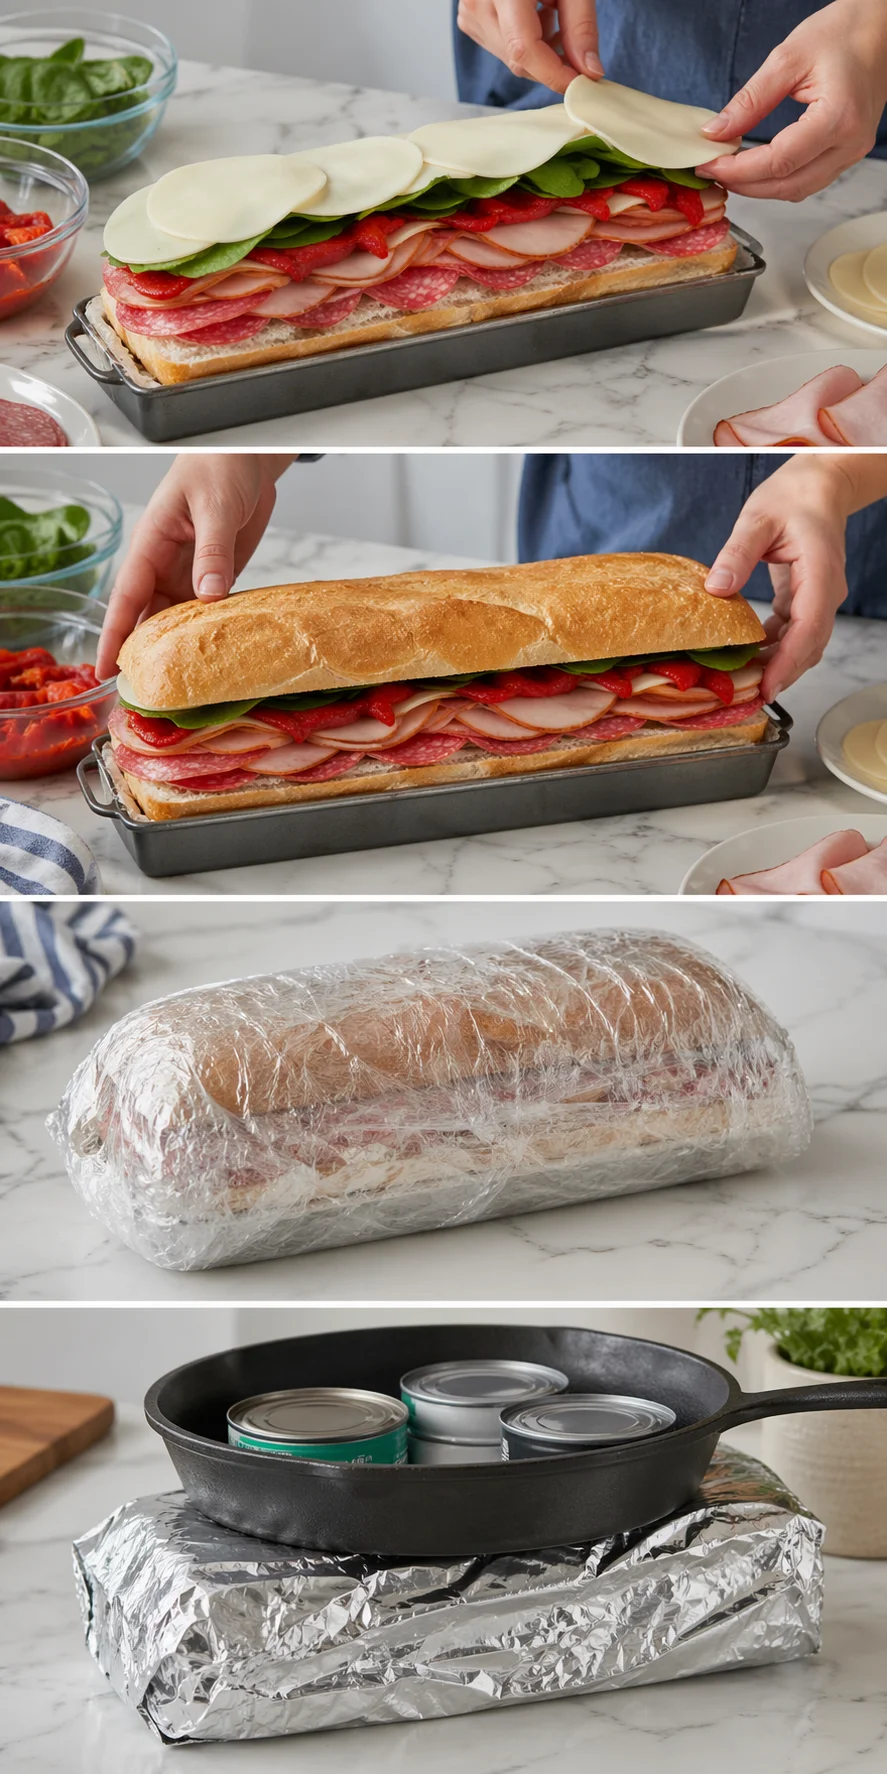
- Layer fillings starting with salami, then ham or turkey, roasted red peppers, baby spinach, and provolone; overlap slices slightly and repeat until the loaf is filled.
- Place the lid back on the filled loaf.
- Wrap the entire loaf tightly in plastic wrap, then wrap again in foil.
-
Weight the wrapped loaf with a heavy skillet and canned goods to compress it.
- Refrigerate the weighted loaf for at least 8 hours, preferably 12–24 hours.
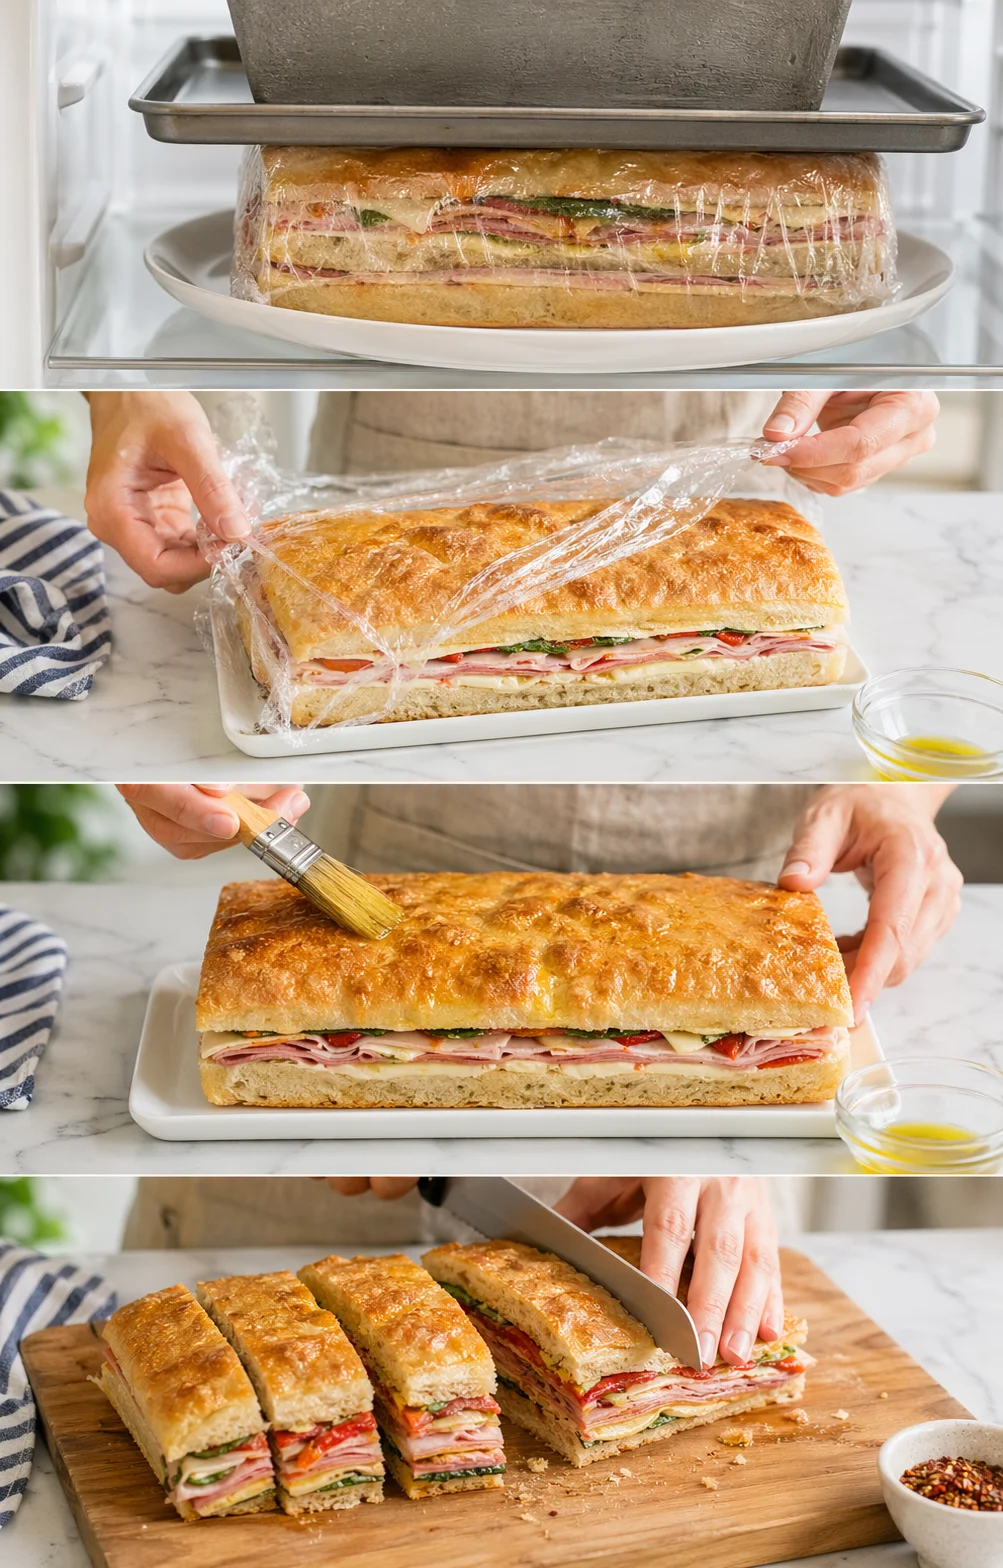
- Unwrap the loaf after chilling.
- Brush the crust lightly with olive oil or melted butter for shine and extra crunch.
-
Cut the loaf with a serrated bread knife into wedges (for a round) or rectangles (for ciabatta).
-
Insert toothpicks or mini flags into slices if desired to keep them tidy for serving or transport.
Tips for Flawless Results
Here’s a confession: my first try with a flimsy bread ended up as “sandwich soup.” Lesson learned! Now I check loaf toughness by pressing my thumb into the crust—if it bounces back, you’re good to go. Another upgrade? Adding fresh spinach for color after a kiddo declared my original too “beige.” Honest feedback helps, right?
Flavor Twists and Substitutions
Once you’ve mastered the classic Pressed Italian Picnic Sandwich Loaf, it’s time to play chef and get creative. This recipe is super flexible—like a blank canvas ready for all your favorite flavors. Whether you’re catering to specific diets or just craving something different, these five fun twists will wow your crew.
Skip the meat and go full veggie goddess! Layer grilled eggplant, zucchini, roasted red peppers, marinated artichokes, and crumbled feta cheese with a generous swipe of hummus. It’s bold, beautiful, and vegetarian-friendly without skimping on flavor.
Turn up the heat with spicy capicola, hot salami, and pepper jack cheese. Add pickled jalapeños or pepperoncini, and swap out the tapenade for a chili-garlic spread. Finish with a drizzle of chili oil before pressing to bring the fire.
Hosting a morning gathering? No worries. Fill your loaf with scrambled eggs, crispy bacon or breakfast sausage, sharp cheddar, and crispy hash browns. Spread a thin layer of cream cheese or chipotle mayo for moisture. It’s basically brunch packed into every bite.
Go coastal with a lighter layer of tuna salad (keep mayo light), dill Havarti slices, fresh cucumber ribbons, and peppery arugula. Add capers for a little zing and swap the tapenade for a zesty lemon aioli.
No bread? No problem. Hollow out large bell peppers and layer your favorite sandwich fillings inside—Italian meats, cheese, veggies, and tapenade drizzle. Press and chill just like the original for a low-carb, big-flavor update.
Whichever version you try, the magic is in the pressing. It transforms your ingredients into a sliceable, stunning, crowd-pleasing star. Have fun, experiment, and enjoy the applause at every get-together.
Make-Ahead and Storage Tips
This loaf is made for make-ahead magic—you’ll want to assemble and press for at least 8 hours, though 12–24 hours overnight gives the best flavor meld. If you need to prep early, assembling up to 24 hours ahead is fine, but beyond that, some veggies might change texture.
For refrigeration and short-term storage:
- Keep your wrapped loaf in the fridge at 40°F (4°C) or below. Wrap first in plastic wrap, then a layer of foil to lock in freshness and protect from fridge odors. Store it flat so your pressure stays even.
- Eat within 3–4 days. If your loaf has perishable fillings like egg salad or tuna, aim for 2 days max.
- If you slice the loaf ahead, layer slices with parchment paper in an airtight container to keep them from drying out. Plan to eat sliced leftovers sooner as they dry faster.
Freezing (not ideal but possible):
- Freezing changes the texture of bread and veggies. If you must freeze, wrap the whole loaf very tightly (plastic wrap then foil) and keep in the freezer up to 1 month. Thaw overnight in the fridge, then bring to room temp for 30–60 minutes before serving. You can also press lightly again to help bring the layers back together.
- A smarter freezing plan is to freeze the individual components (tapenade, cooked meats, roasted peppers) separately, then assemble fresh when you’re ready to enjoy.
Reheating and serving tips:
- Classic way: Serve cold or room temperature—this brings out the best flavors and keeps the loaf easy to slice and transport.
- Oven: Heat your oven to 350°F (175°C). Remove plastic wrap but keep foil on. Warm the wrapped loaf for 8–12 minutes until heated through; then unwrap for 2–3 minutes to crisp up the crust.
- Skillet: Heat a little olive oil or butter in a pan and toast individual slices 1–2 minutes per side until warm and slightly crisped. This keeps the sandwich from getting soggy.
- Microwave: It’s not the best for whole slices as it can make bread rubbery. If you need to, microwave in short bursts of 15–30 seconds and finish in a hot skillet or under a broiler for a crisp finish.
Transport tips and food safety: Keep the loaf chilled in an insulated cooler with ice packs when you’re on the go. Don’t leave it out longer than 2 hours (or 1 hour if it’s hotter than 90°F / 32°C). For best texture and presentation, slice just before serving when possible.
Common Questions, Quick Answers
Q: Can I press it for just 2 hours?
A: You can, but the flavors won’t meld fully. Aim for at least 6 hours, but overnight is truly the sweet spot.
Q: Help! My bread got soggy.
A: Next time, try these tips: 1) Use drier ingredients (pat peppers dry!), 2) Add a cheese layer right next to the bread, 3) Use heavier weights—pressure really helps!
Q: Are there vegetarian options?
A: Absolutely! Grilled vegetables, marinated artichokes, and hummus layers are delicious and keep the loaf moist and flavorful.
A crusty round loaf hollowed and filled with layers of Italian deli meats, cheese, vegetables, and olive tapenade, pressed overnight into a mess-free, sliceable, flavorful picnic centerpiece.
- Prep Time: 20 minutes (plus chilling time)
- Cook Time: 0 minutes
- Total Time: 8 to 24 hours (including chilling/pressing time)
- Yield: 8-10 servings 1x
- Category: Sandwich
- Cuisine: Italian-inspired
Ingredients
- 1 large crusty round loaf (boule or Italian; slightly stale bread preferred; ciabatta works with less hollowing)
- 1/4 cup olive tapenade (or pesto plus chopped Kalamata olives)
- 4 slices provolone cheese (or cashew cheese slices for a vegan option)
- 6 slices salami (spicy if desired; alternatives: capicola or soppressata)
- 6 slices ham or turkey (roasted turkey adds sweetness; vegetarian swap: grilled zucchini slices)
- 4 roasted red pepper strips (jarred or homemade; pat dry to remove moisture)
- 1 cup baby spinach (or substitute with arugula or fresh basil)
- Olive oil (for brushing the crust before serving)
Instructions
- Slice off the top quarter of the loaf.
- Scoop out the soft interior, leaving approximately a 1-inch thick shell; trim tricky crust spots with scissors if needed.
- Pat roasted red pepper strips dry to remove excess moisture.
- Spread olive tapenade evenly on the loaf base and on the removed loaf lid; optionally spread a thin layer of cream cheese under the tapenade.
- Layer fillings inside the loaf in order: salami slices first, followed by ham or turkey, roasted red peppers, baby spinach, and provolone cheese. Slightly overlap slices and repeat layers until loaf is filled.
- Place the loaf lid back on the filled loaf.
- Wrap the entire loaf tightly in plastic wrap, then wrap again in foil.
- Place a heavy weight (such as a skillet and canned goods) on top of the wrapped loaf to compress it.
- Refrigerate the weighted loaf for at least 8 hours, preferably 12 to 24 hours.
- After chilling, unwrap the loaf.
- Brush the crust lightly with olive oil or melted butter for shine and extra crunch.
- Cut the loaf with a serrated bread knife into wedges (if round) or rectangles (if ciabatta).
- Optionally insert toothpicks or mini flags into slices to keep them tidy for serving or transport.
Notes
Use slightly stale, sturdy bread to prevent sogginess under pressing., Pat vegetable fillings dry to reduce moisture and prevent soggy bread., A cheese layer next to bread can serve as a moisture barrier., Try creative variations: vegetarian with grilled veggies and hummus, spicy with hot salami and chili-garlic spread, breakfast style with eggs and bacon, or coastal style with tuna salad and lemon aioli., For transport, keep chilled in insulated cooler with ice packs; do not leave out more than 2 hours (1 hour if above 90°F/32°C)., Store wrapped loaf refrigerated at or below 40°F (4°C) for 3-4 days; 2 days if perishable fillings like egg or tuna salad., Freezing whole loaf possible up to 1 month but changes texture; better to freeze components separately and assemble fresh., Reheat options include oven (350°F/175°C for 8-12 minutes wrapped, then crisp unwrapped), skillet to toast slices, or brief microwave bursts finished in skillet or broiler., Flavor intensifies with longer pressing; minimum 6 hours but overnight best for melding flavors.
Nutrition
- Serving Size: 1 wedge or slice
- Calories: Approx. 350-450 calories per serving (varies by fillings)
- Fat: Approx. 15-20 g per serving
- Carbohydrates: Approx. 30-40 g per serving
- Protein: Approx. 20-25 g per serving