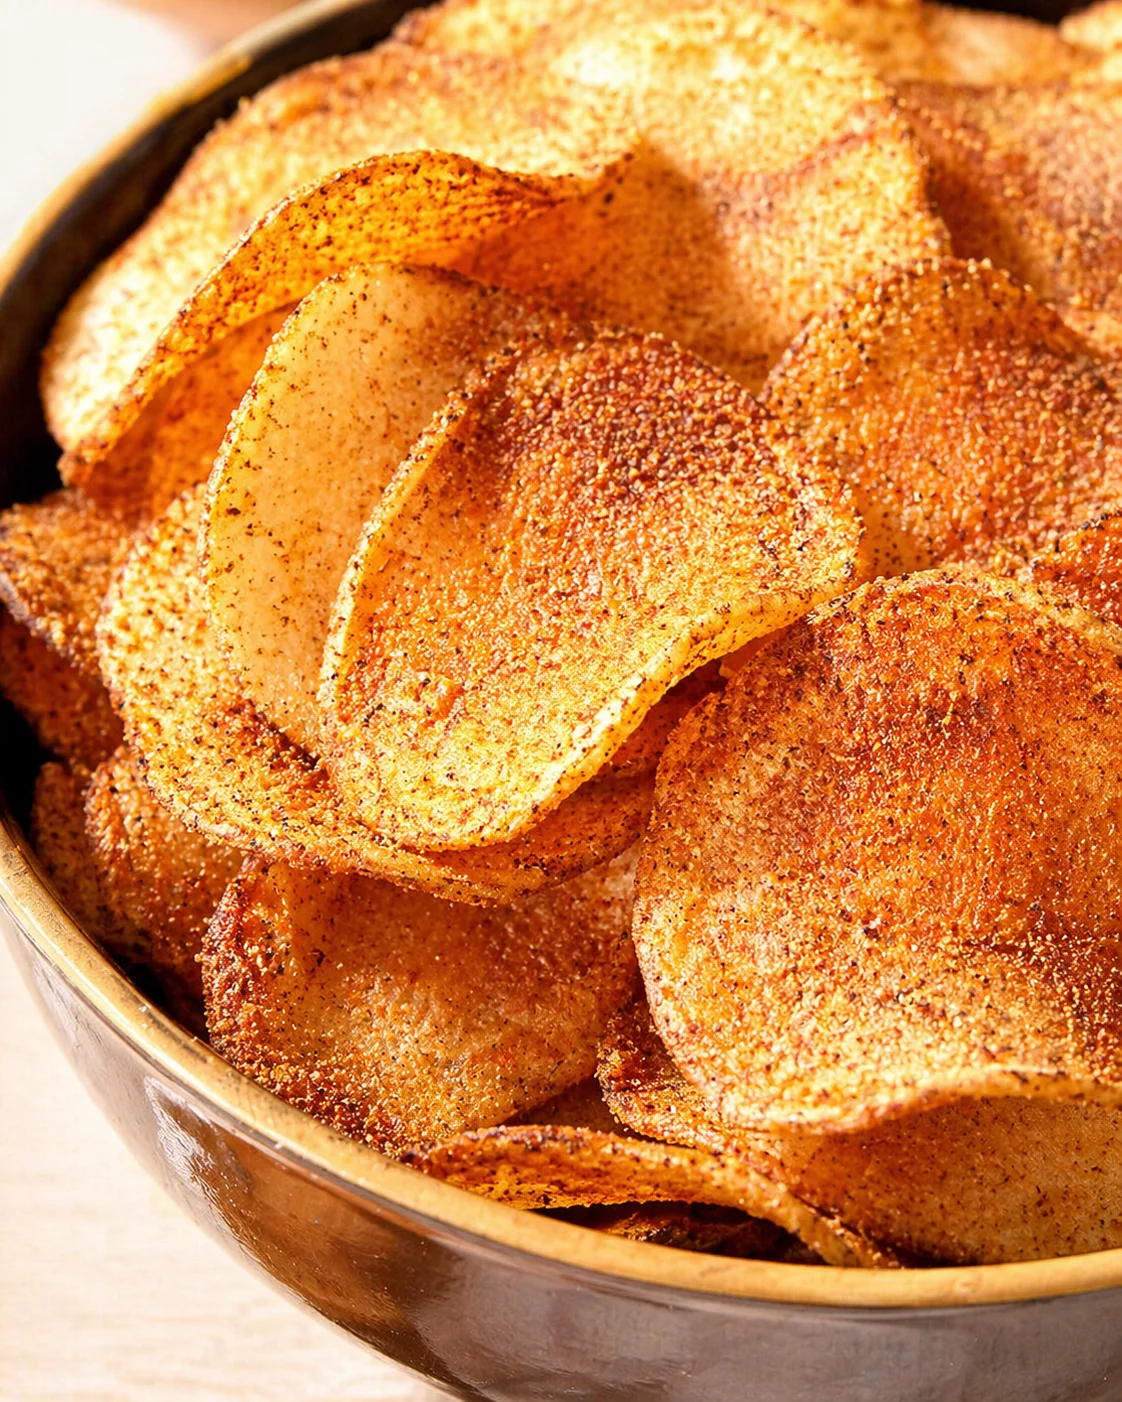
Homemade BBQ Chips (Barbecue Chips)
Looking at how many potato recipes I share, you might think potatoes are my absolute favorite veggie.
While I wouldn’t say they’re number one, I do really enjoy cooking and snacking on potatoes.
Whenever I buy potatoes, buying a 5-pound bag is definitely more economical than grabbing a few loose ones. But if you’re cooking for one, that’s a lot of spuds to use up.
So when I pick up a bag, I plan to make several potato dishes to make it worthwhile.
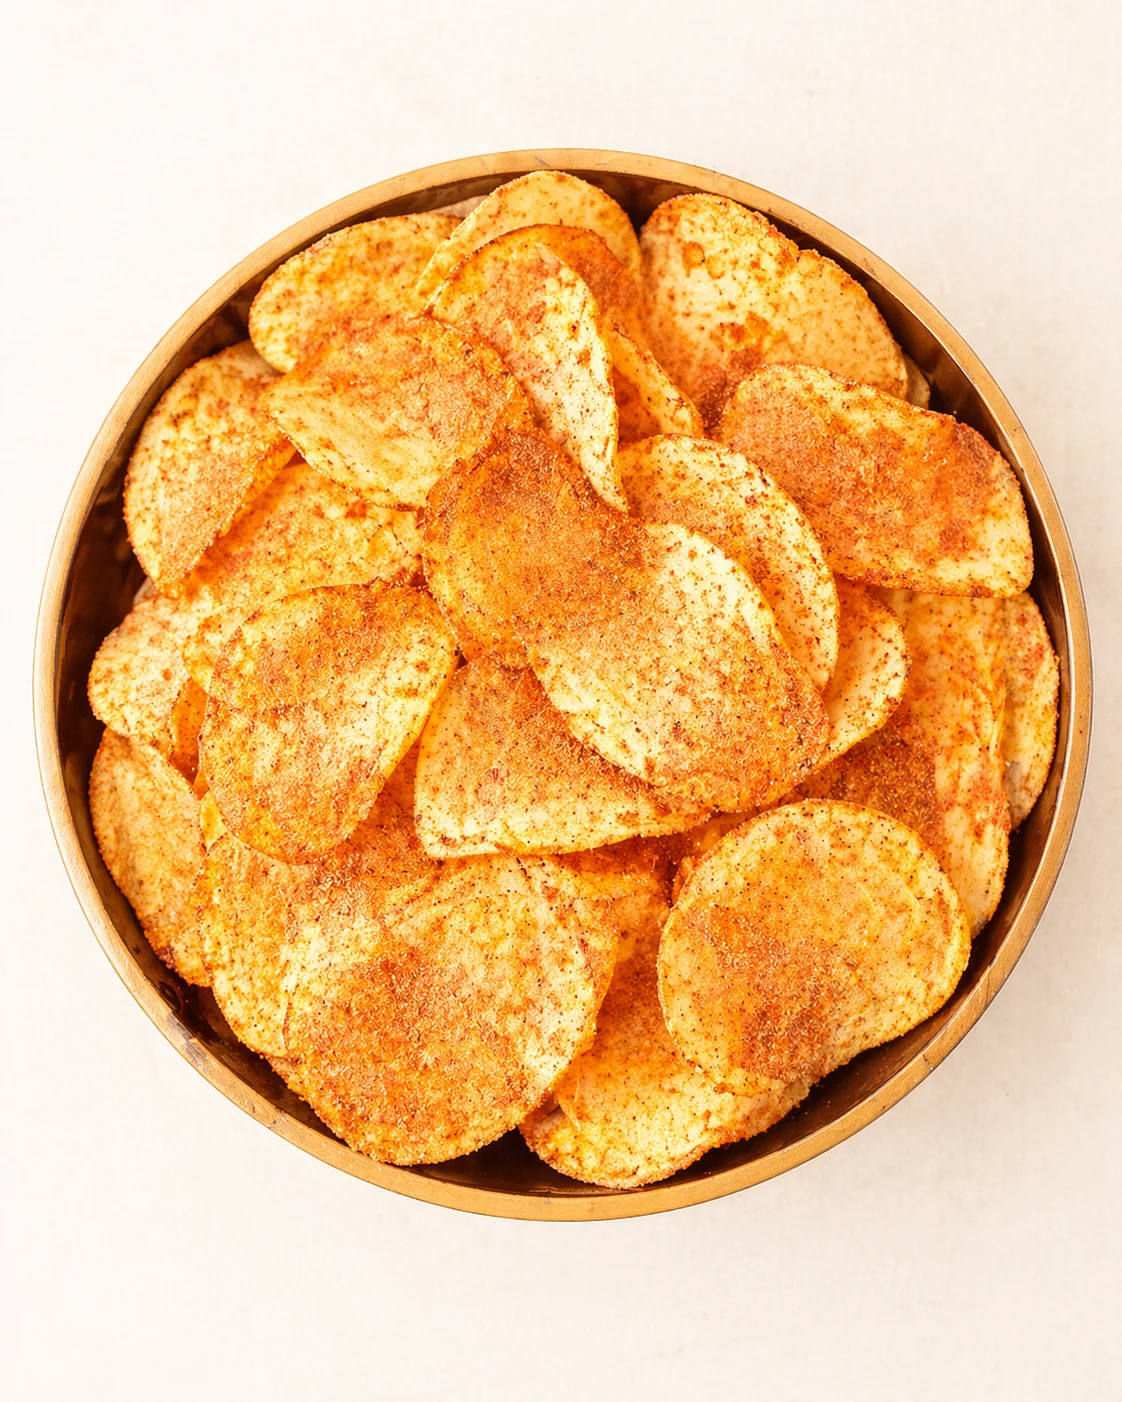
I’d been meaning to try making Homemade BBQ Chips for a while, so after whipping up mashed potatoes for a couple of servings, I went ahead and made multiple batches of chips.
Of course, I ended up devouring them even faster than it took to cook them! Why do delicious snacks never last long?
Just like with my salt and vinegar chips, I made both fried and baked versions of BBQ chips and tossed them with a tasty barbecue spice mix.
Personally, I lean toward baked chips since they use less oil, but I’ve included both methods here so you can choose your favorite way to make them.
If you haven’t tried homemade barbecue chips yet, trust me, you’re missing out big time.
The next potato chip flavor I wanted to try was… barbecue! Or is it BBQ? Or maybe barbeque? Whichever way you say it, it’s delicious.
Making the seasoning for barbecue chips is a bit of a balancing act since everyone’s spice tolerance and flavor preferences are so different.
The first seasoning mix I tested had a bit too much paprika for my liking, though a bunch of folks loved it. So I tweaked it a bit to find a better balance.
Remember, the strength of spices can vary a lot. The chili powder you grab on sale might be milder than one from a specialty spice shop.
Feel free to play around and adjust the seasoning here so it fits exactly what you like.
If you love that satisfying crunch and smoky flavor of BBQ chips from the store but want something fresher and fully customizable, you’re in the right spot. Here, I’ll guide you through making your own homemade barbecue chips using just one russet potato and a handful of common spices — no strange ingredients or preservatives needed.
You’ll learn two simple ways to cook them: bake them for a lighter, less oily snack or fry them for that classic extra-crispy bite. I’ll share tips on slicing thinly (mandoline is your best friend), why soaking the potatoes matters, how to nail the seasoning mix, and the best way to toss the chips so the flavor sticks perfectly.
Along the way, I’ll give you troubleshooting tips, fun ways to tweak the flavor (if you love it hotter, smokier, or sweeter), smart storage ideas to keep chips crunchy, and a printable recipe card so you can jump right in. Stick with me, and you’ll be munching on bright, smoky homemade BBQ chips before you know it.
Why These Chips Shine
These homemade BBQ chips give you crisp, fresh potato goodness with bold barbecue flavor — none of the artificial stuff or extra packaging you get from store-bought chips. Plus, this recipe is super flexible. You can bake or fry, make just a little snack for yourself or a big batch for guests, and rely on easy pantry spices you probably already have. Since you season your chips yourself, you can dial up the sweetness, smokiness, or heat just how you like it.
- Crunchy, fresh chips with texture you control — slicing thin and soaking gets you there.
- Tweak the spice blend however you want — more smoky, sweeter, or hotter — and the blend is great on crispy sweet potato chips, too.
- Choose fried for crunch, baked for lighter bites, or go with homemade air fryer potato chips for a happy medium.
- Simple and wallet-friendly — just one large russet makes a great snack portion.
Ingredients and Spice Blend
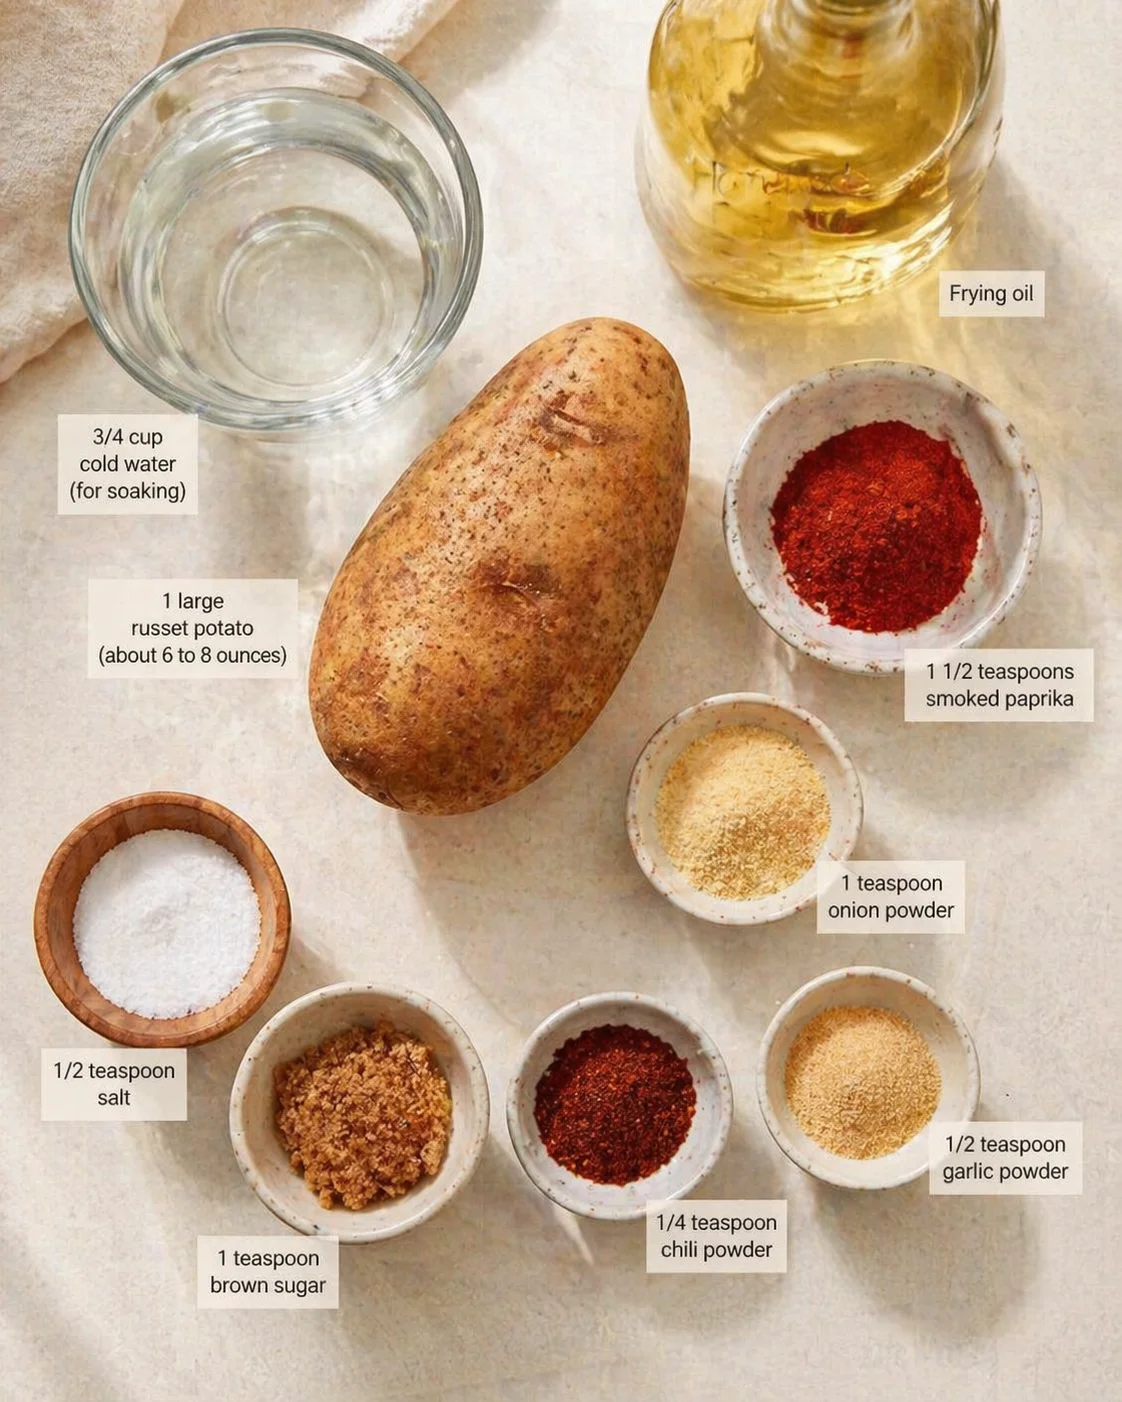
- 1 large russet potato (about 6 to 8 ounces), peeled or left with skin on
- 3/4 cup cold water (for soaking)
- 1 1/2 teaspoons smoked paprika
- 1 teaspoon onion powder
- 1 teaspoon brown sugar
- 1/2 teaspoon garlic powder
- 1/2 teaspoon salt
- 1/4 teaspoon chili powder
- Frying oil (vegetable, peanut oil, or another neutral oil) — enough to fill your frying pot or pan, or just enough to brush on slices if baking
Slice, Cook, and Season
- Slice the potato very thinly (about 1/10 inch / 2.5 mm) using a mandoline or sharp knife; peeling is optional.
- Place the potato slices in a bowl, cover with cold water, and soak for 30 minutes.
- While the potatoes soak, combine smoked paprika, onion powder, brown sugar, garlic powder, salt, and chili powder in a large freezer bag or airtight bowl to make the seasoning.
-
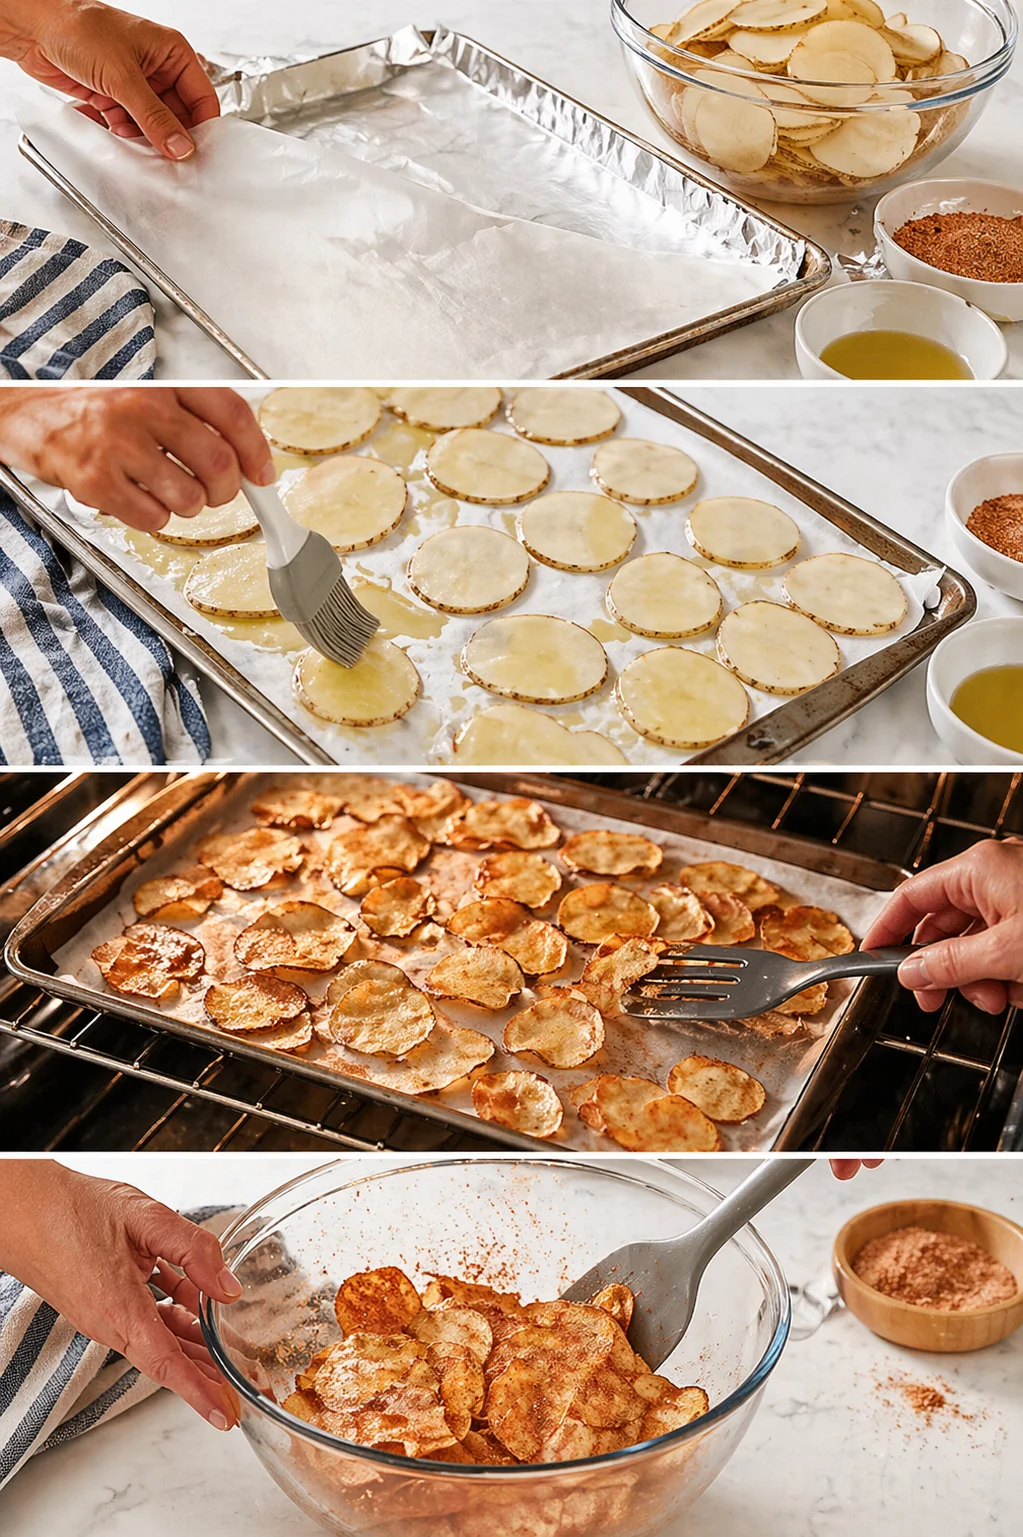
Drain the soaked slices and pat them completely dry with paper towels or a clean kitchen towel.
- If baking, preheat the oven to 400°F and line baking sheets with greased foil or parchment.
- Arrange potato slices in a single layer on the prepared sheets and brush each slice lightly with oil.
- Bake the slices 10 to 15 minutes, watching smaller pieces and removing them as they become golden and crisp.
-
Let baked chips cool a few minutes to finish crisping, then toss them in the seasoning while still warm.
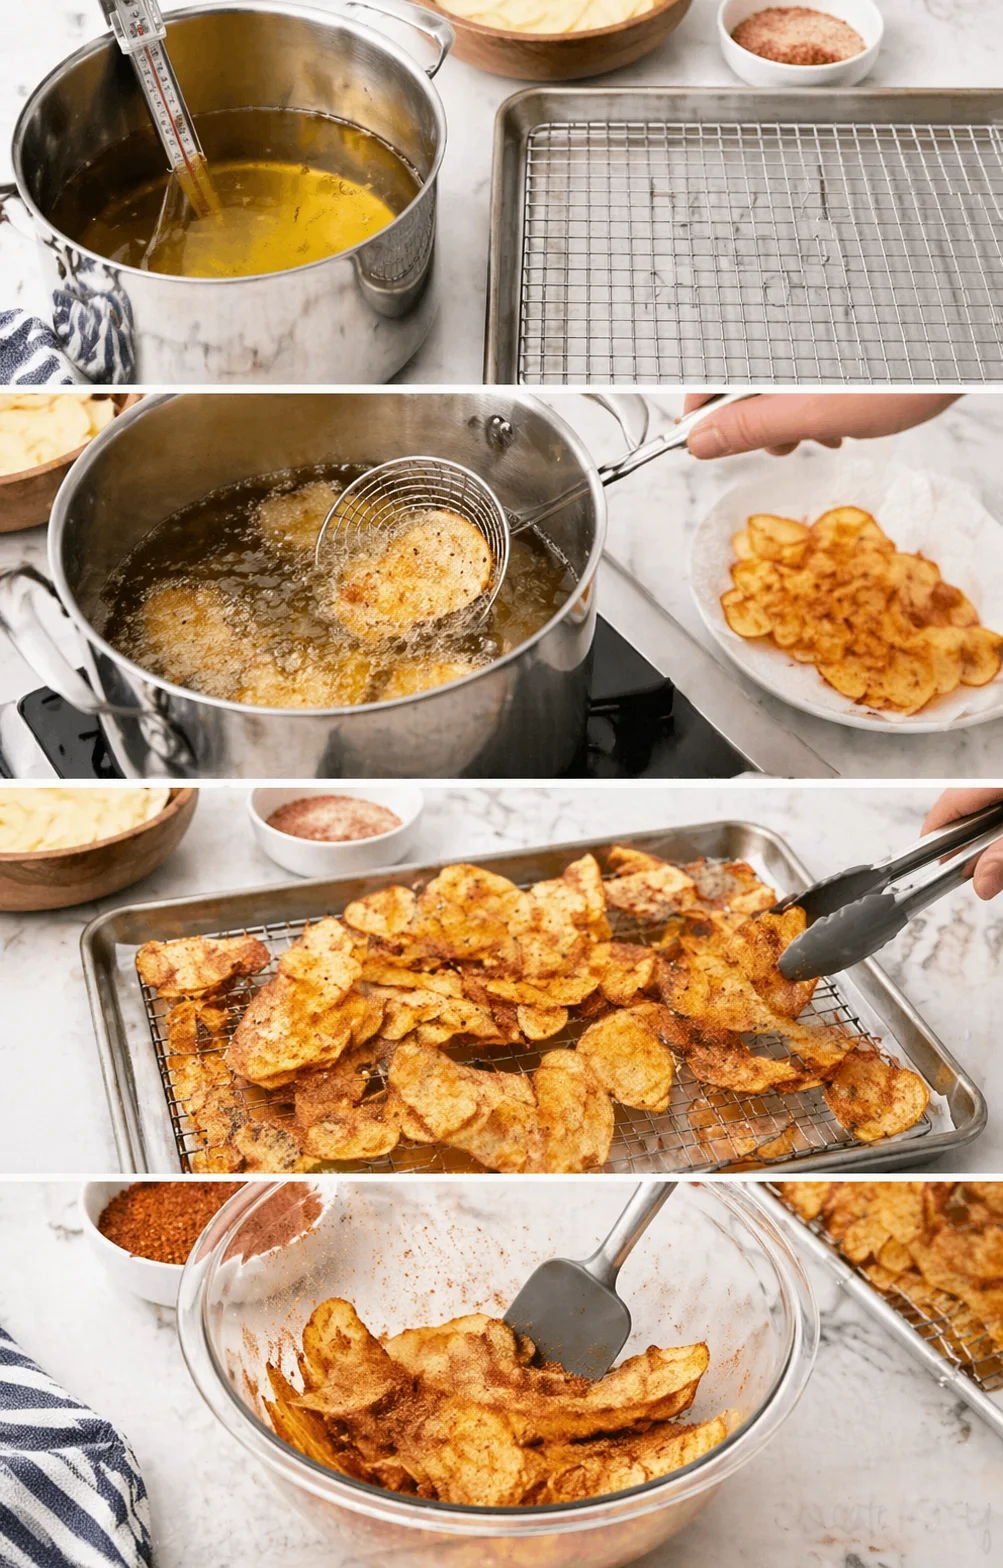
- If frying, heat oil in a deep fryer or heavy, deep saucepan to 350°F and set a cooling rack over a cookie sheet to drain the chips.
- Double-check slices are dry, then fry small batches for about 3 to 5 minutes, flipping halfway through, until golden brown and crispy; do not overcrowd the pan.
- Transfer fried chips to the cooling rack and let them drain and crisp for a few minutes.
-
Toss warm fried chips in the seasoning blend so the flavors cling, and repeat frying remaining slices, allowing the oil to return to 350°F between batches.
Pro Tips for Crispy Chips
- A mandoline slicer is your best bet for paper-thin, uniform slices (around 1/10 inch or 2.5 mm). Don’t forget to use the hand guard for safety every single time.
- Soak slices in cold water for 30 minutes to pull out starch — this keeps chips from sticking and helps them crisp beautifully.
- Pat slices completely dry before cooking. Water causes splatters in hot oil and soggy chips in the oven.
- If frying, heat oil to 350°F and fry chips in small batches to avoid crowding. Flip halfway through frying, then drain on a cooling rack so air can circulate and chips stay crisp.
- When baking, brush each slice lightly with oil and bake at 400°F. Watch smaller pieces closely to pull them before they burn.
- Toss chips in the barbecue seasoning while they’re still warm so the flavors cling nicely.
- Keep cooled chips airtight to maintain crunch. If they get a little stale, pop them back in a 200°F oven for a few minutes to refresh.
- Make a small test batch first to adjust spices, since paprika and chili powder can vary in strength depending on the brand.
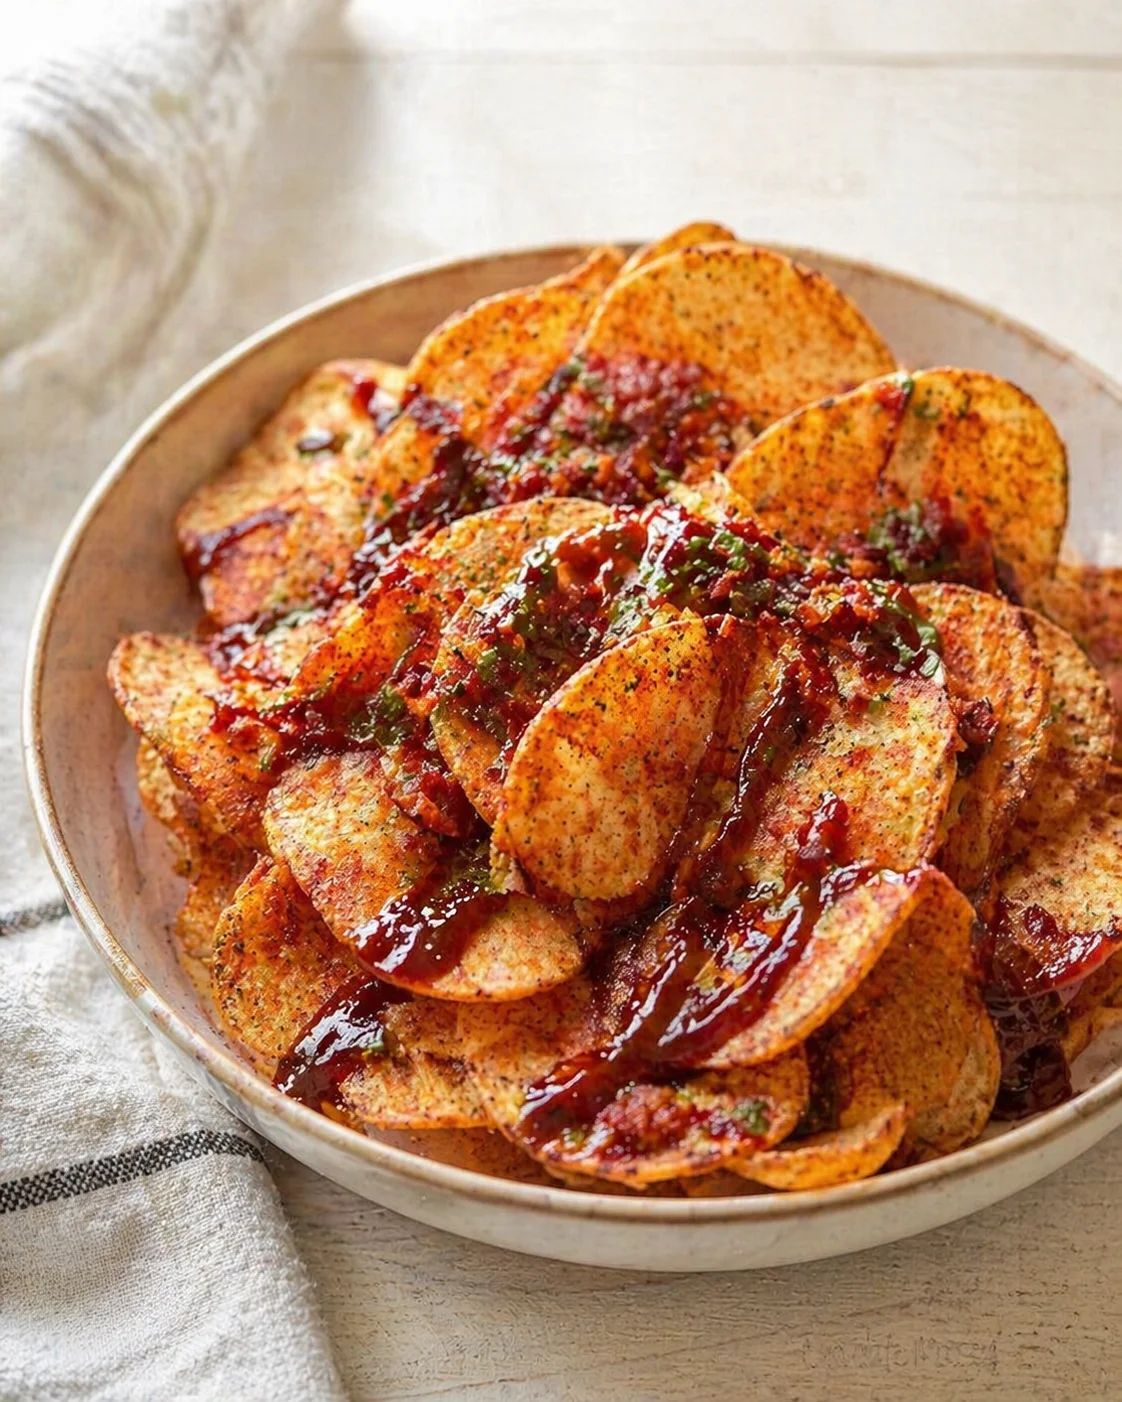
Serve these delicious BBQ chips as a snack with your favorite dips like ranch, blue cheese, or a zesty barbecue sauce. They also make a perfect crunchy side to sandwiches, burgers, or a picnic spread—especially alongside a bowl of Steakhouse Potato Salad. You can even crush them up as a crispy topping on salads or baked casseroles for some extra texture. If you’re craving a tangier chip, try these salt and vinegar zucchini chips.
Flavor Twists and Substitutions
- Spicy BBQ: Amp up the chili powder or add 1/8 to 1/4 teaspoon cayenne or chipotle powder for a real kick.
- Smokier flavor: Add extra smoked paprika or a tiny drop of liquid smoke in your spice mix for rich, smoky notes.
- Sweeter BBQ: Stir in an extra 1/2 teaspoon brown sugar or sprinkle a bit on the finished chips for a sweet glaze.
- Potato swaps: Try Yukon Gold or sweet potatoes for a twist. Just watch cook times carefully since they vary in moisture and thickness.
- Air fryer method: Lay slices single layer in the basket and air fry at 375°F for 8-12 minutes, flipping or shaking halfway, until perfectly crispy.
- Parmesan garlic twist: Toss finished chips with grated Parmesan and a pinch more garlic powder for a savory upgrade.
- Salt & vinegar style: Use vinegar powder or lightly mist chips with distilled white vinegar, then immediately toss with extra salt. Re-crisp briefly in the oven if needed for tangy crunch.
- Turn up the heat with extra chili powder, cayenne, or smoky chipotle for a spicy kick.
- Add a little grated Parmesan and garlic powder after cooking for a cheesy, savory treat.
- Try sweet potato chips for a naturally sweeter chip that still crisps beautifully.
- Use an air fryer for quicker cooking with less oil — just air fry at 375°F for 8–12 minutes, shaking halfway through.
- Go tangy with salt & vinegar style by misting finished chips with vinegar and tossing with extra salt.
Answers to Common Questions
Soaking your potato slices in cold water before cooking pulls out extra starch, which helps stop the chips from sticking together and makes them turn out crispier and lighter.
- Can I use other types of potatoes? Absolutely! Yukon Gold or sweet potatoes work well, but adjust cooking time since they vary in moisture and thickness.
- Do I have to peel the potatoes? Nope! Leaving the skin on adds texture and nutrients, but peel if you prefer smooth chips.
- Can I make these gluten-free? Yes, all the ingredients here are naturally gluten-free — just check your spice labels to be sure.
- How do I store leftover chips? Keep them airtight at room temperature. Avoid humidity to prevent sogginess.
- Can I make the seasoning without sugar? Sure! Skip the brown sugar for a less sweet seasoning, or swap in a little honey powder if you want a natural sweet touch.
- Why do chips sometimes turn soggy? It usually means they weren’t dried well before cooking or stored in a container that traps moisture. Make sure to dry slices well and use an airtight container with good airflow; for a quick look at thin-slicing and drying that promote crispness, see our Quick Air Fryer Apple Chips.